Follow Me On Social Media!
Cool Whip Dyed Easter Eggs: Easy, Colorful Family Fun
Introduction to Cool Whip Dyed Easter Eggs
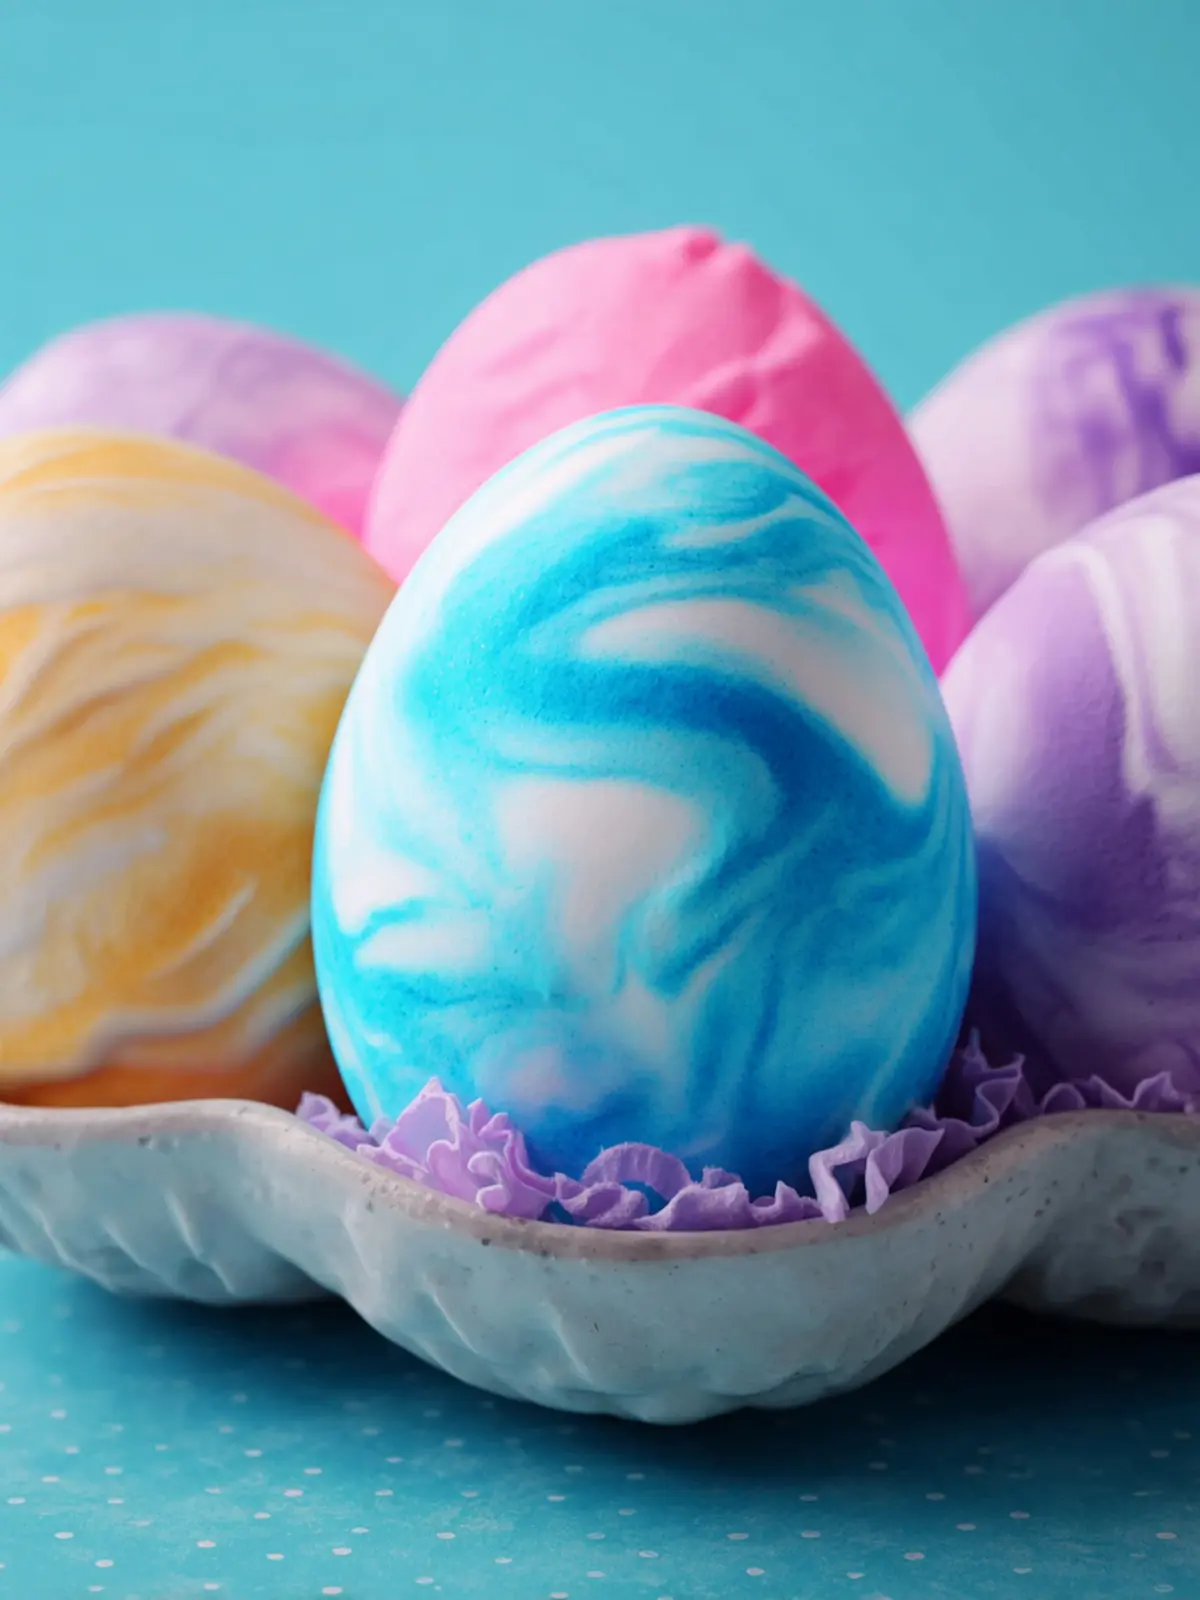
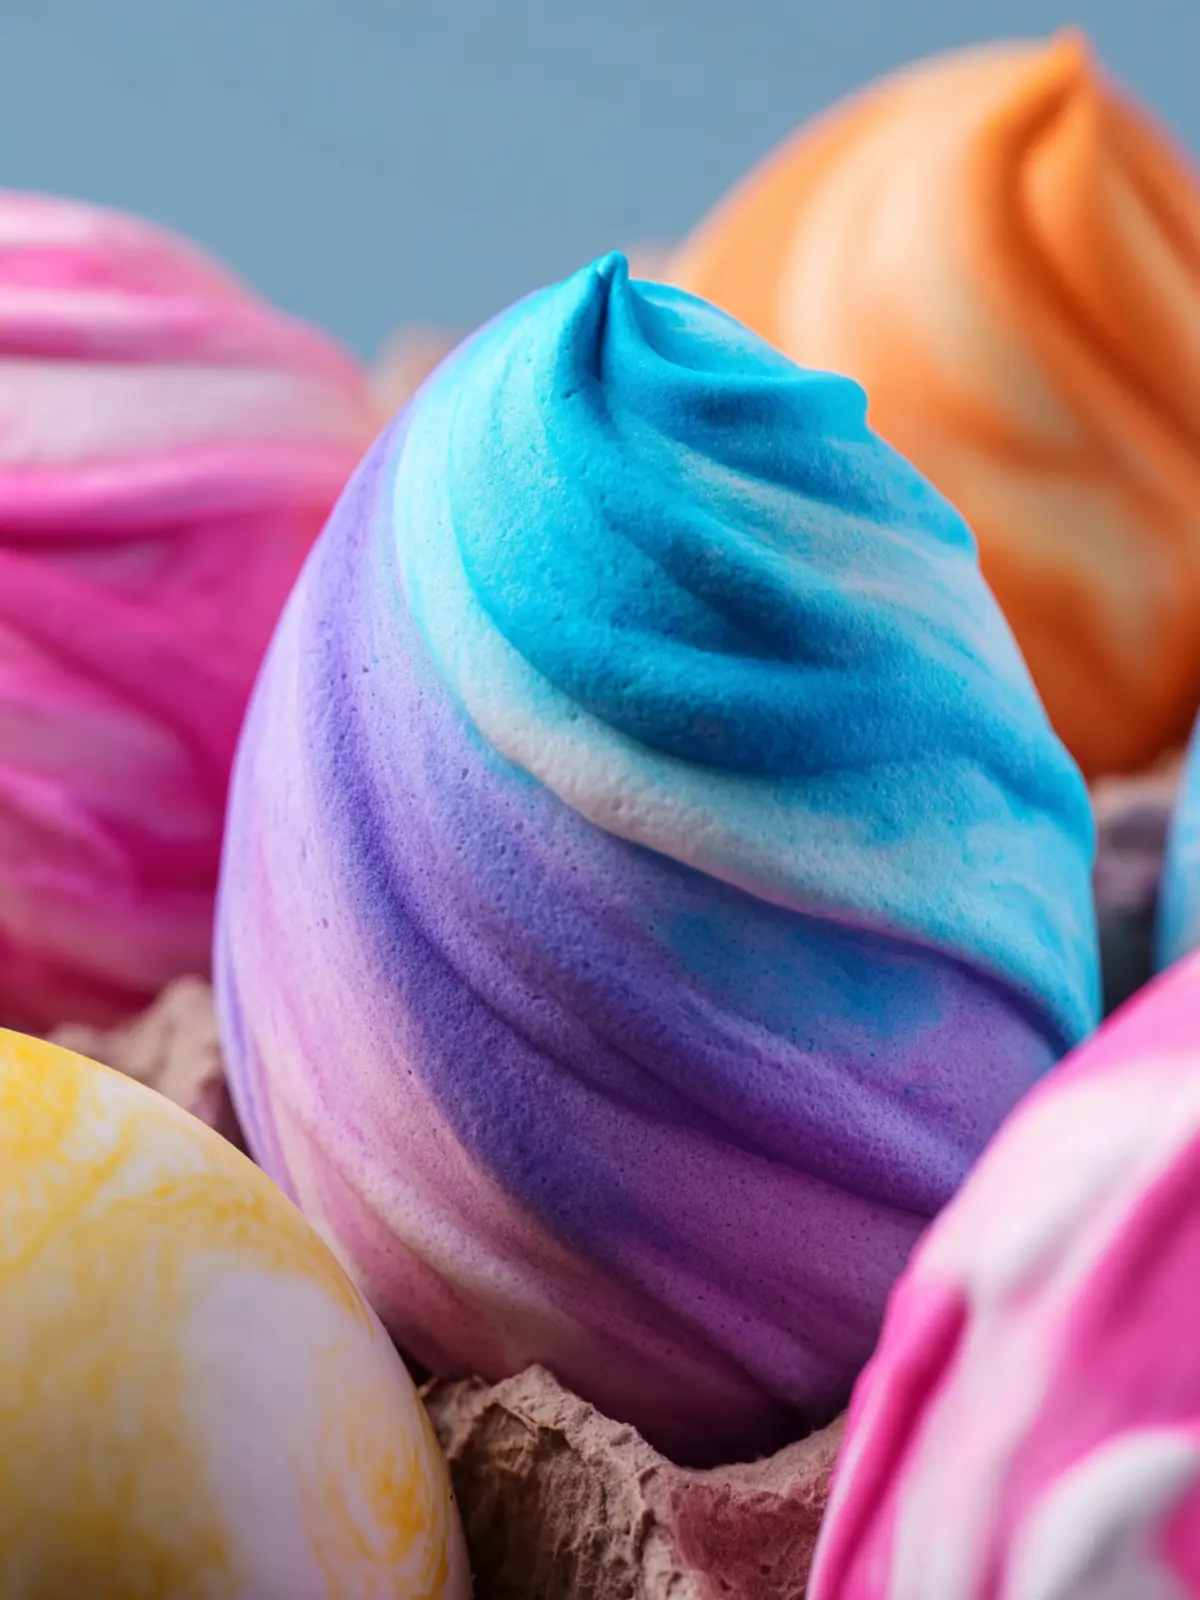
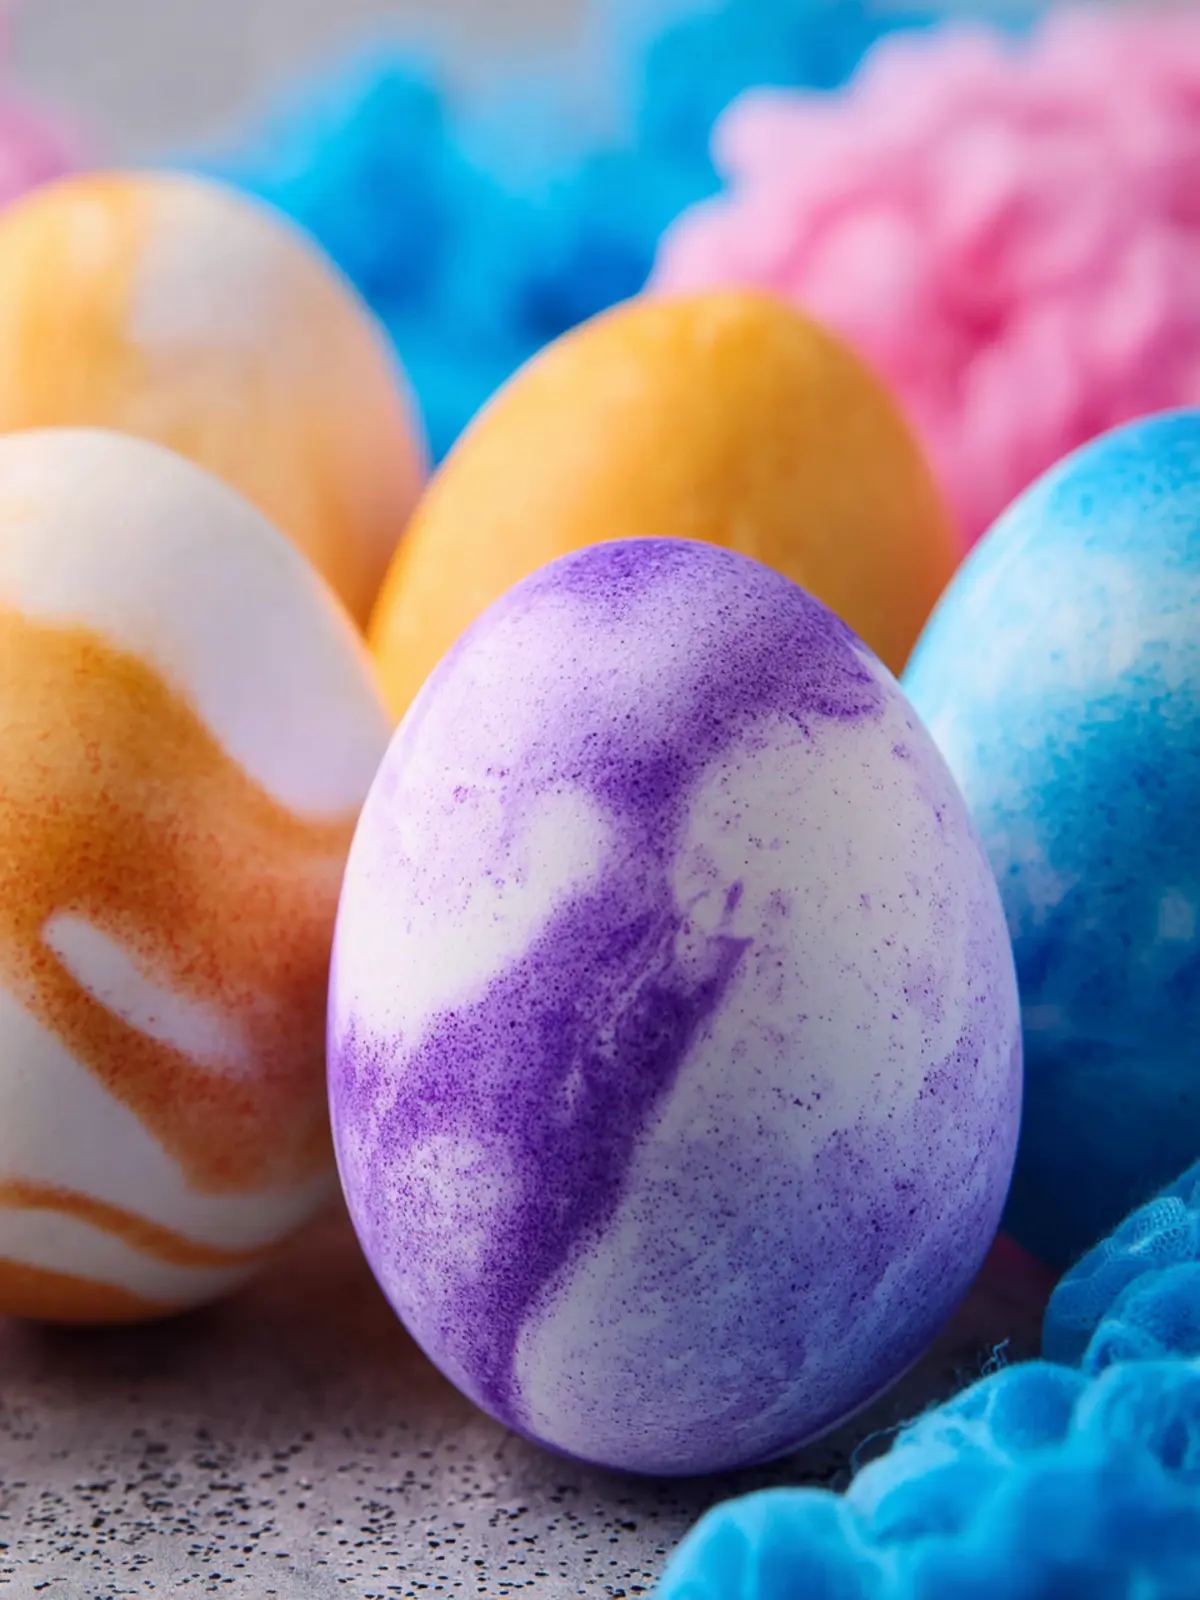
Cool Whip Dyed Easter Eggs bring a playful twist to the traditional art of egg decorating, transforming a classic activity into a vibrant and creative experience. Imagine gathering around the kitchen table, armed with nothing but a carton of Cool Whip and an array of brilliant dye colors. This method has a way of turning a simple Easter tradition into an unforgettable project that not only enhances the aesthetic of your egg hunt but also invites you to unleash your inner artist.
The joy of decorating Easter eggs extends beyond mere aesthetics; it’s a cherished ritual that fosters creativity and connection with loved ones. Whether you recall fond memories of dye stains on your fingers from childhood or are exploring this delightful tradition as a young adult, the act of decorating eggs together creates a sense of togetherness that is truly special. Sharing laughter, tips, and unexpected moments as the colors swirl and blend can undoubtedly lift spirits and deepen your bonds.
With Cool Whip Dyed Easter Eggs, you can take this festive pastime to new heights. This method not only makes the process fun and less messy but also produces beautiful, one-of-a-kind designs without the worry of traditional dye spills. The creamy texture of Cool Whip acts as a wondrous canvas, allowing for endless creativity, whether you aim for pastel perfection or bold, vibrant splashes.
To get started, you’ll need a few pantry staples—Cool Whip, some food coloring, and of course, hard-boiled eggs. Why not try gathering some friends for a DIY egg-dyeing party? Not only will you create colorful eggs, but you might also inspire each other with unique patterns and designs. The laughter and joy that fills your home will become a treasured memory.
Ultimately, Cool Whip Dyed Easter Eggs push the envelope of conventional egg decorating, inviting everyone to express their unique styles while celebrating the whimsical spirit of Easter. So grab those ingredients and prepare for a delightful time crafting beautifully dyed eggs!
Key Ingredients for Cool Whip Dyed Easter Eggs
Creating Cool Whip Dyed Easter Eggs is a delightful and fun activity that combines creativity with a bit of nostalgia. With just a few simple ingredients, you can transform plain white eggs into colorful masterpieces, reminiscent of the ones we all enjoyed as kids.
-
Cool Whip: This fluffy topping is the star of the show. Not only does it create a unique tie-dye effect, but it also adds a creamy texture that captures the vibrant colors beautifully. If you’re feeling adventurous, you can mix in flavored varieties for a unique twist!
-
Food Coloring: Use your favorite gel or liquid food colors to brighten up the Cool Whip Dyed Easter Eggs. The vibrant hues will make your eggs pop and reflect your personality. Combine colors for intricate designs, or go with bold shades for a striking effect.
-
Hard-boiled Eggs: The foundation of this recipe, hard-boiled eggs, provide a sturdy canvas for your dyeing adventure. Make sure they are fully cooled before dipping them in the colorful mixture.
This simple yet charming process not only adds flair to your Easter celebration but also opens the door to creativity and family bonding. Enjoy crafting your colorful creations!
Why You’ll Love This Recipe
Creating Cool Whip Dyed Easter Eggs isn’t just a delightful culinary project; it’s an experience that brings a little joy to your holiday celebrations. Picture this: you gather with friends and family to color those Easter eggs, but instead of the usual dye kits, you explore a fun and creative twist with Cool Whip! This special ingredient lends a velvety texture and vibrant colors that are not just pleasing to the eye but also super fun to create.
Easy Clean-Up
One of the best parts of this recipe is how simple it is to clean up. Who wants to deal with splatters and stains from traditional dyes? With Cool Whip, you’ll keep your kitchen mess-free, allowing you to enjoy the fun without the hassle.
Perfect for All Ages
Whether you’re an adult honing your crafting skills or a kid just getting started with art, Cool Whip Dyed Easter Eggs invite everyone to unleash their inner artist. The process encourages creativity, making it a wonderful bonding activity.
A Unique Twist
Forget the standard pastels! With Cool Whip and food coloring, the color options are limitless. You can mix shades to create unique designs or opt for more vibrant hues that stand out. Plus, the surprise of discovering how each egg turns out adds to the excitement!
Dive into this recipe and witness a delightful tradition unfold with a modern twist. You’ll certainly find yourself coming back to it year after year!
Variations of Cool Whip Dyed Easter Eggs
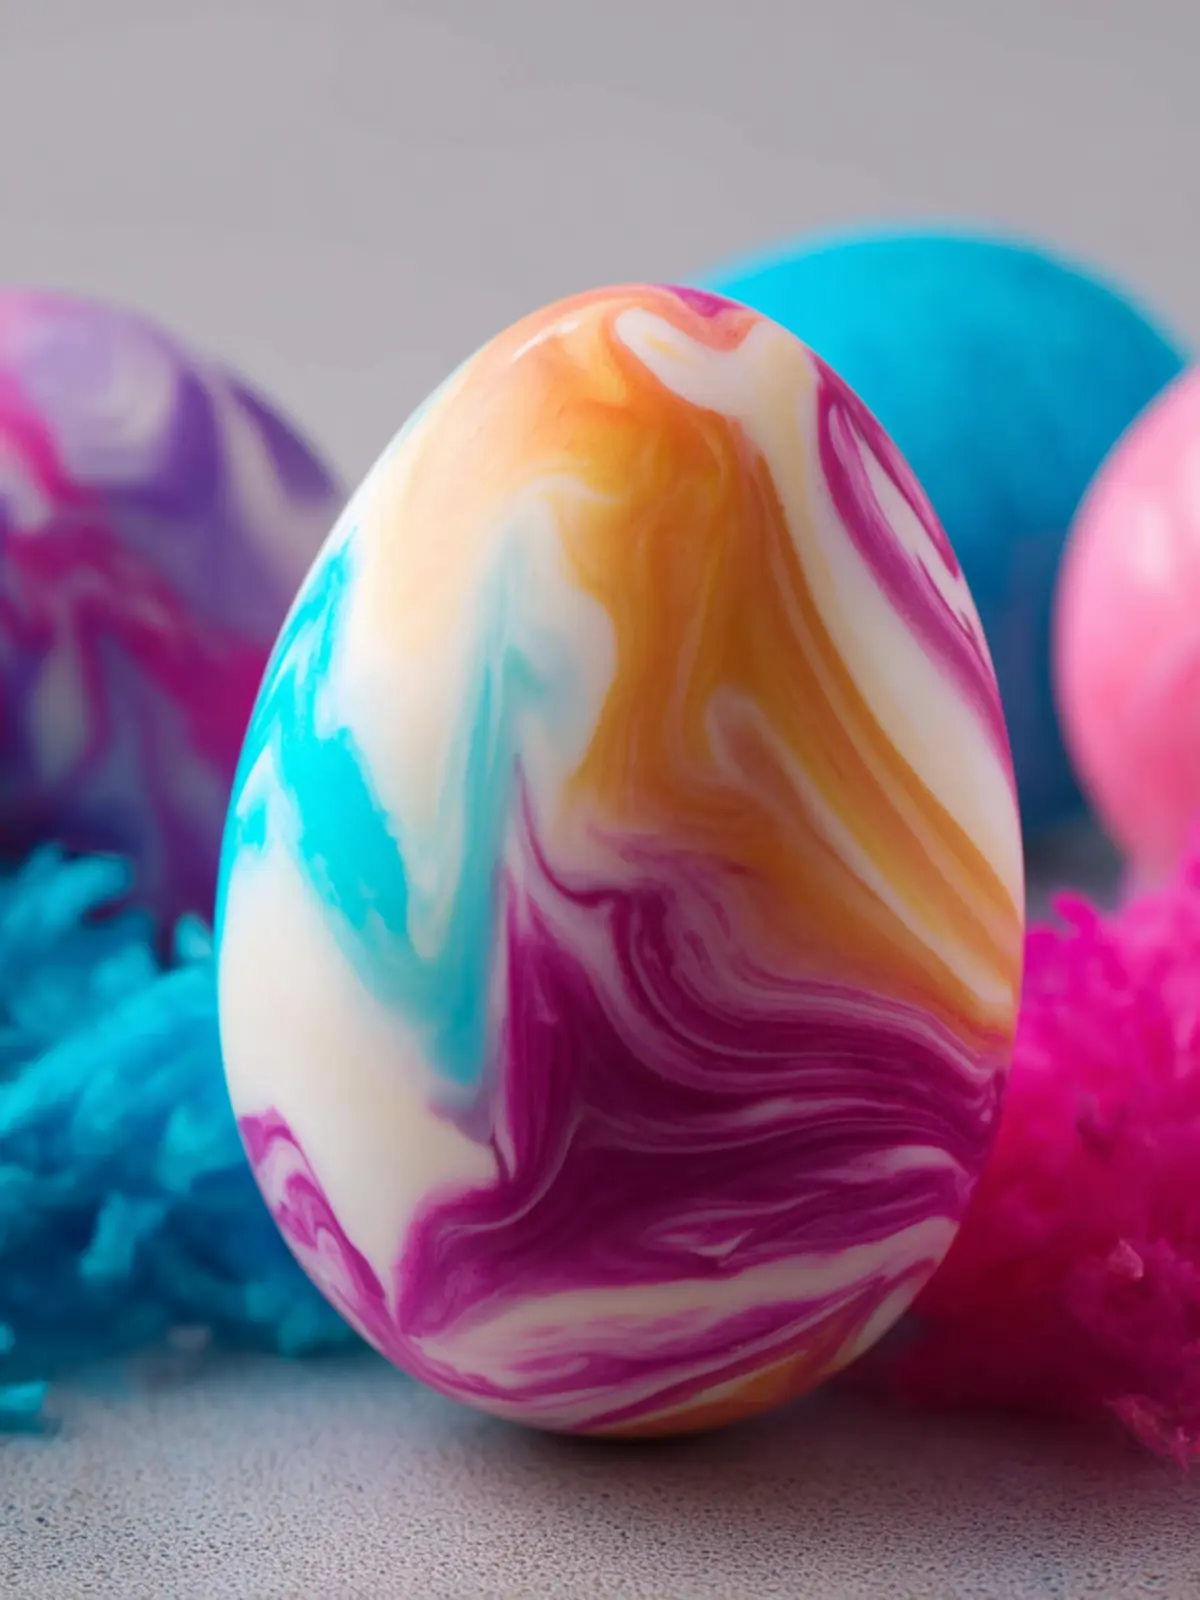
The tradition of dyeing Easter eggs can take on a delightful twist with Cool Whip Dyed Easter Eggs, and exploring variations can make your celebrations even more fun. This creative approach not only colors your eggs vibrantly but adds a whimsical touch to your festivities. Below, let’s dive into some exciting variations that will spark your imagination.
Color Explosion
One way to enhance your Cool Whip Dyed Easter Eggs is to mix multiple food coloring hues into the whipped topping. Imagine swirls of pastel pinks, blues, and yellows covering your eggs! Letting your kids or friends choose their color combinations can turn this into a bonding activity, making the experience even more memorable.
Textured Designs
Adding texture creates visual interest and could come from common kitchen items. Try sprinkling crushed cereal or sprinkles on top of the Cool Whip before dipping your eggs. This not only ensures a fun design but also gives a crunchy surprise when you bite into them!
Flavor Infusion
Why stop at color? You can infuse different flavors into the whipped topping using flavored extracts like vanilla, almond, or even lemon. Each egg becomes an exciting surprise, with not just a colorful exterior but a hint of flavor awaiting inside.
Experimenting with these variations will undoubtedly enhance the experience of creating beautifully dyed eggs. You might just start a new holiday tradition!
Cooking Tips and Notes for Cool Whip Dyed Easter Eggs
Creating Cool Whip dyed Easter eggs is not just a fun activity; it’s a delightful way to explore your creativity while celebrating the season. Here are some handy tips to ensure your egg-dyeing experience is both vibrant and memorable.
Choosing the Right Eggs
- Freshness Matters: Start with room-temperature eggs for even dyeing. Whether you’re using white or brown eggs, the dye colors will pop off the surface beautifully.
- Prepping the Shell: Gently rinse the eggs and let them dry completely. This helps the Cool Whip adhere better for a more vivid color payoff.
Mastering the Cool Whip Technique
- Use Enough Cool Whip: Don’t skimp! Cover each egg generously, allowing the colors to blend artistically. This creates a swirling effect that’s simply stunning.
- Layering Colors: Experiment with layering different colors of dye over cooled Cool Whip. It creates unique marbled patterns, making each egg a one-of-a-kind masterpiece.
Cleaning Up and Storing
- Protect Your Workspace: Lay down newspapers or tablecloths to catch any spills. It makes cleaning up easier and adds an extra layer of fun to the process.
- Store Properly: Once dyed, refrigerate your eggs in a covered container. They’ll be ready for your Easter celebration and can last about a week!
Using these tips, you’re on your way to producing eye-catching Cool Whip dyed Easter eggs that will impress family and friends alike. Happy crafting!
Serving Suggestions for Cool Whip Dyed Easter Eggs
With Cool Whip Dyed Easter Eggs in hand, you’re ready to elevate your Easter celebration. These vibrant, creamy creations not only serve as festive decor but also as a delightful snack that can charm your family and friends.
Pairing with Sweet Treats
Consider serving these eggs alongside a plate of cookies or a slice of cheesecake. The rich flavor of Cool Whip enhances the sweetness of traditional Easter desserts, creating a well-rounded treat ensemble that would make any dessert table shine.
Creating an Egg Display
Get creative with your presentation! Arrange your dyed Easter eggs in a colorful basket lined with shredded paper or grass. Add a few small chocolate bunnies or jelly beans to create a fun Easter-themed centerpiece that’ll catch everyone’s eye.
Fun for the Kids
For a kid-friendly approach, turn egg-decorating into a game. Use eggs as bases for making creative egg characters. Incorporate small edible accessories like mini chocolate chips or candy eyes, then finish it off with more Cool Whip for that extra touch of creaminess. Who wouldn’t want to snack on a character they made themselves?
Make it a Brunch Item
Lastly, why not incorporate your Cool Whip Dyed Easter Eggs into your brunch spread? They can serve as a unique addition to omelets or salads, providing a pop of color and flavor that everyone will appreciate.
Embrace the joy of creativity and share some delicious memories this Easter!
Time Breakdown for Cool Whip Dyed Easter Eggs
Creating Cool Whip Dyed Easter Eggs is not only fun but also quite simple when you understand how to manage your time. This delightful activity can be a great way to bond with family or friends while getting your creative juices flowing. Here’s a quick view of how much time you’ll need for this colorful project.
Preparation Time
In just about 15 minutes, you can gather your ingredients and whip the Cool Whip into vibrant colors. This step will have you feeling excited as you get ready to dye your eggs.
Dyeing Time
After preparing your dyes, allow those eggs to soak in the Cool Whip for 30 minutes. This is when the magic happens, and you’ll see the colors transform.
Total Time
In roughly 45 minutes, you’ll have completed your Cool Whip Dyed Easter Eggs! Spend a little time admiring your handiwork before displaying them proudly. Enjoy the process as much as the result!
Nutritional Facts for Cool Whip Dyed Easter Eggs
When it comes to colorful activities during the springtime, Cool Whip Dyed Easter Eggs add a delightful twist to traditional egg decorating, bursting with vibrant colors while providing a fun experience for friends and family. Let’s take a closer look at the nutritional facts related to this playful treat.
Calories
One large hard-boiled egg contains about 70 calories, making these Cool Whip Dyed Easter Eggs a guilt-free indulgence that won’t derail your healthy eating goals.
Protein
With around 6 grams of protein per egg, they are a wonderful source of energy, helping you stay full and satisfied while enjoying your creative endeavors.
Sodium
On average, a large egg has about 70 mg of sodium. This makes Cool Whip Dyed Easter Eggs a tasty choice that won’t significantly contribute to your daily sodium intake when enjoyed in moderation.
Embrace the festive spirit with colorful eggs that are both fun to create and can fit into a balanced diet!
FAQ about Cool Whip Dyed Easter Eggs
Decorating Easter eggs with Cool Whip isn’t just about coloring; it’s about creating joyful memories and delightful surprises in your kitchen. Here, we answer some common questions that will guide you through the process and ensure your Cool Whip dyed Easter eggs are a hit.
Can I eat the eggs after decorating?
Yes, you can! The key is to make sure that you’re using food-safe dye and that the eggs are properly boiled and cooled. Once you’ve created your beautiful Cool Whip dyed Easter eggs, you can enjoy them as part of your festive celebrations! Just keep in mind to store them properly to maintain freshness.
How long will the dyed eggs last?
Dyed eggs can last about one week in the refrigerator. To keep your Cool Whip dyed Easter eggs at their best, store them in a covered container. If you notice any unusual smells or changes in appearance before the week is up, it’s best to err on the side of caution and discard any eggs you’re unsure about.
Can I use other types of dye?
Absolutely! While Cool Whip creates beautiful, swirled designs with food-safe dyes, you can experiment with other dyeing methods too. Traditional egg dye kits, natural dyes from vegetables and spices, or even gel food coloring can yield vibrant results. The beauty of decorating eggs is in the creativity, so feel free to explore what works best for you!
Embrace the fun of decorating and let your creativity shine this Easter with Cool Whip dyed eggs!
Conclusion on Cool Whip Dyed Easter Eggs
Incorporating Cool Whip Dyed Easter Eggs into your festivities can bring both a burst of color and a fun, interactive experience for everyone involved. Whether you’re involving the kids or hosting a casual gathering with friends, this unique method not only entertains but also allows for creativity and personal expression. The vibrant colors and marbled designs make each egg a one-of-a-kind masterpiece! Plus, the process of dyeing eggs with Cool Whip is straightforward and low-stress, making it an enjoyable way to celebrate the season. So grab your supplies and let your artistic flair shine this Easter!
Print
Dyed Hard-Boiled Eggs
- Total Time: 30 minutes
- Yield: 24 eggs 1x
- Diet: Vegetarian
Description
Colorful dyed hard-boiled eggs using Cool Whip and food coloring.
Ingredients
Scale
- 24 tub hard-boiled eggs
- 1 tub Cool Whip
- assorted colors of gel or liquid food dyes
- 1 cup white distilled vinegar
Instructions
- Prep the Eggs: Soak boiled eggs in vinegar for 15 minutes, then rinse and dry.
- Prepare the Dye: Spread Cool Whip evenly in a 9×13 dish. Add drops of food dye in different areas and swirl with a toothpick.
- Dye the Eggs: Wearing gloves, roll eggs in the dyed Cool Whip until fully coated. Let them sit for at least 10 minutes.
- Rinse & Dry: Gently rinse eggs (without rubbing) and place on paper towels to dry completely.
Notes
- Color may vary based on the food dye used.
- Ensure eggs are completely dry before storing.
- Prep Time: 15 minutes
- Category: Easter
- Method: No-cook
- Cuisine: American
Nutrition
- Serving Size: 1 egg