Follow Me On Social Media!

Sourdough Boule: The Best Homemade Bread You’ll Ever Make
Introduction to Sourdough Boule
There’s something truly remarkable about baking your own sourdough boule, a rustic round loaf that fills your kitchen with an enchanting aroma and creates a warm sense of home. Picture this: You return from a busy day to the comforting scent of freshly baked bread, its crust crackling as you slice into it, revealing its soft and airy interior. The experience of crafting a sourdough boule is as fulfilling as enjoying the first warm slice slathered with butter.
A sourdough boule stands out not only for its beautiful appearance but also for its unique flavor profile—all thanks to the natural fermentation process. Instead of relying on commercial yeast, this delicious loaf harnesses the power of wild yeast and lactic acid bacteria present in your sourdough starter. This not only makes a loaf that’s deeply flavorful but also enhances its nutritional benefits.
What really makes homemade sourdough boule exceptional is the way it transforms the simplest ingredients into something magical. Consider the satisfying crust that cracks as you bite in, giving way to a chewy, airy crumb with delightful pockets of irregularity. Each slice provides an invitation to savor a nuanced balance of tanginess and a hint of sweetness—a combination that you won’t find in store-bought varieties.
Additionally, making your own sourdough boule allows you to embrace the art of bread-making, creating a connection with your food that’s often lost in fast-paced modern life. The slow process of fermentation teaches patience and gratitude, resulting in a loaf that’s not just food but a reflection of your care and effort. It’s hard to quantify the joy of sharing a slice with a loved one or enjoying it solo, wrapped in a moment of mindfulness with your morning coffee.
With this recipe, you’ll embark on an adventurous culinary journey, armed with only flour, water, salt, and your beloved sourdough starter. So roll up your sleeves, let the magic happen, and prepare to revel in the joys of your homemade sourdough boule.
Key Ingredients for Sourdough Boule
Crafting the perfect sourdough boule is both an art and a delicious experience. With just a handful of essential ingredients, you can create a loaf that offers a delightful crisp crust and a soft, airy interior. Here’s what you’ll need:
-
Flour: I often choose unbleached all-purpose flour for my sourdough boule. Its protein content helps in achieving the desired structure, while a bit of whole wheat flour adds depth. If you’re feeling adventurous, experimenting with bread flour can also elevate your bread.
-
Water: Using room temperature filtered water is key. It hydrates your dough properly, activating the gluten and ensuring a beautiful rise. A little tip: the more active your starter is, the less water you may need.
-
Salt: Sea salt is my go-to for flavor and strength. It not only enhances the taste but also helps control the fermentation process. Remember, a little salt goes a long way in balancing the flavors!
-
Sourdough Starter: This is where the magic happens. A mature sourdough starter gives your bread that signature tang and airy texture. If you don’t have a starter yet, it’s worth the effort to cultivate one; the flavors become richer over time.
These simple yet vital components are the backbone of a sourdough boule, transforming the ingredients into a homemade masterpiece that fills your home with warmth and nostalgia.
Why You’ll Love This Recipe
Imagine the warm, inviting aroma of a sourdough boule wafting through your kitchen, making every corner feel like home. This artisan bread is not just a recipe; it’s an experience that begins long before you take the first bite. The process of nurturing your sourdough starter and shaping your loaf brings not only satisfaction but also a deep sense of connection to the food you create.
The Magic of Sourdough
-
Flavor: The natural fermentation process gives this sourdough boule a delightful tang, unlike any store-bought bread. Each bite carries complex flavors that develop over time, making it remarkably satisfying.
-
Texture: With its crusty exterior and soft, chewy interior, this bread strikes the perfect balance, offering a delightful contrast that elevates any meal.
-
Health Benefits: Sourdough is easier to digest and has a lower glycemic index than other breads, thanks to the sourdough fermentation. Plus, it can aid in nutrient absorption.
Perfect for Any Occasion
Whether you’re hosting a dinner party, enjoying a cozy breakfast, or indulging in a simple snack with butter, the versatility of a sourdough boule knows no bounds. Imagine serving warm slices with homemade soups or slathering it with rich avocado for a midday treat. Once you master this recipe, it will quickly become your go-to for all things bread.
Variations of Sourdough Boule
Exploring the world of sourdough boule can be as exciting as baking your first loaf. This rustic bread isn’t just a one-size-fits-all creation; it invites creativity and personalization with every bake. Whether you’re looking to control the flavors or simply have fun in the kitchen, here are some delightful variations to consider.
Flavor-Infused Sourdough Boules
-
Herb-Infused Boules: Adding herbs like rosemary or thyme can elevate your sourdough boule. Simply chop them finely and mix them into your dough during the stretch and fold process. The flavors meld beautifully, creating a fragrant crust.
-
Cheese and Garlic: Try folding in shredded cheese (like cheddar or gouda) and roasted garlic cloves for a savory twist that works wonderfully for sandwiches or alongside soups.
Sweet Variations
-
Cinnamon Raisin Sourdough Boule: A special treat for breakfast, mix in cinnamon and raisins. This gives your loaf a sweet flavor that’s perfect toasted with a bit of butter.
-
Chocolate Chip and Walnut: For an indulgent twist, consider adding chocolate chips and walnuts to your dough. This variation not only offers a delightful flavor but also a satisfying crunch.
Seasonal Fruits
- Apple and Cinnamon: During autumn, toss in diced apples and a sprinkle of cinnamon. The sweetness of the apples pairs perfectly with the tanginess of the sourdough.
With these variations, your sourdough boule can transition from a daily staple to an exciting centerpiece at gatherings or special occasions. Embrace the art of improvisation and let each loaf tell its own story!
Cooking Tips and Notes
Crafting the perfect sourdough boule is not just about the ingredients; it’s also about understanding the process and making the most out of your kitchen experience. Here are some key insights to help you along your sourdough journey:
Understanding Hydration Levels
Water plays a crucial role in how your sourdough boule behaves. If your dough feels too wet and sticky, don’t panic. This high hydration can yield a beautifully airy crumb. However, you can adjust the water slightly if you prefer a stiffer dough. Experimentation is part of the fun!
Kneading Techniques
When kneading, gentle stretching and folding can work wonders. Make sure not to over-knead; rather, aim for a smooth dough that still retains some elasticity. Remember, slow and steady wins the race!
The Importance of Fermentation
Patience is key when it comes to fermentation. Allow your dough to rise until it has doubled in size. Factors like temperature and humidity will affect this, so keep an eye on it. A warm kitchen is ideal for allowing the natural yeast to flourish.
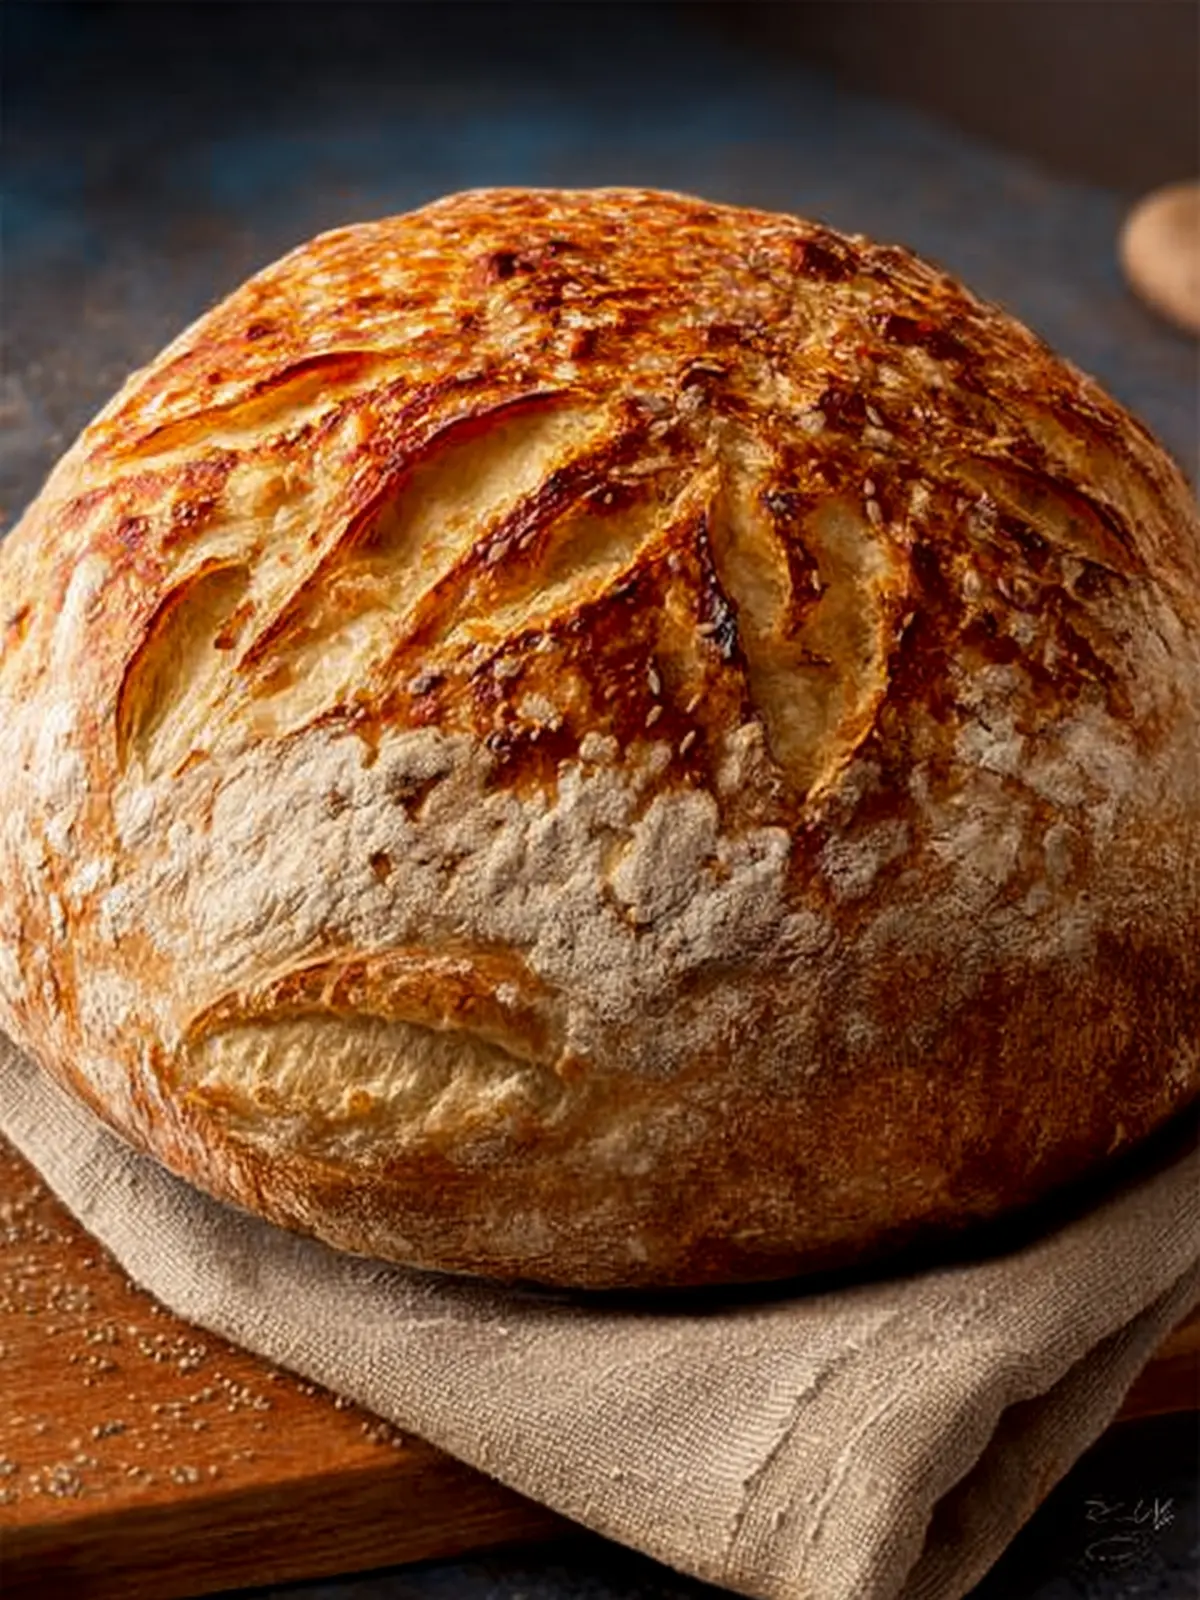
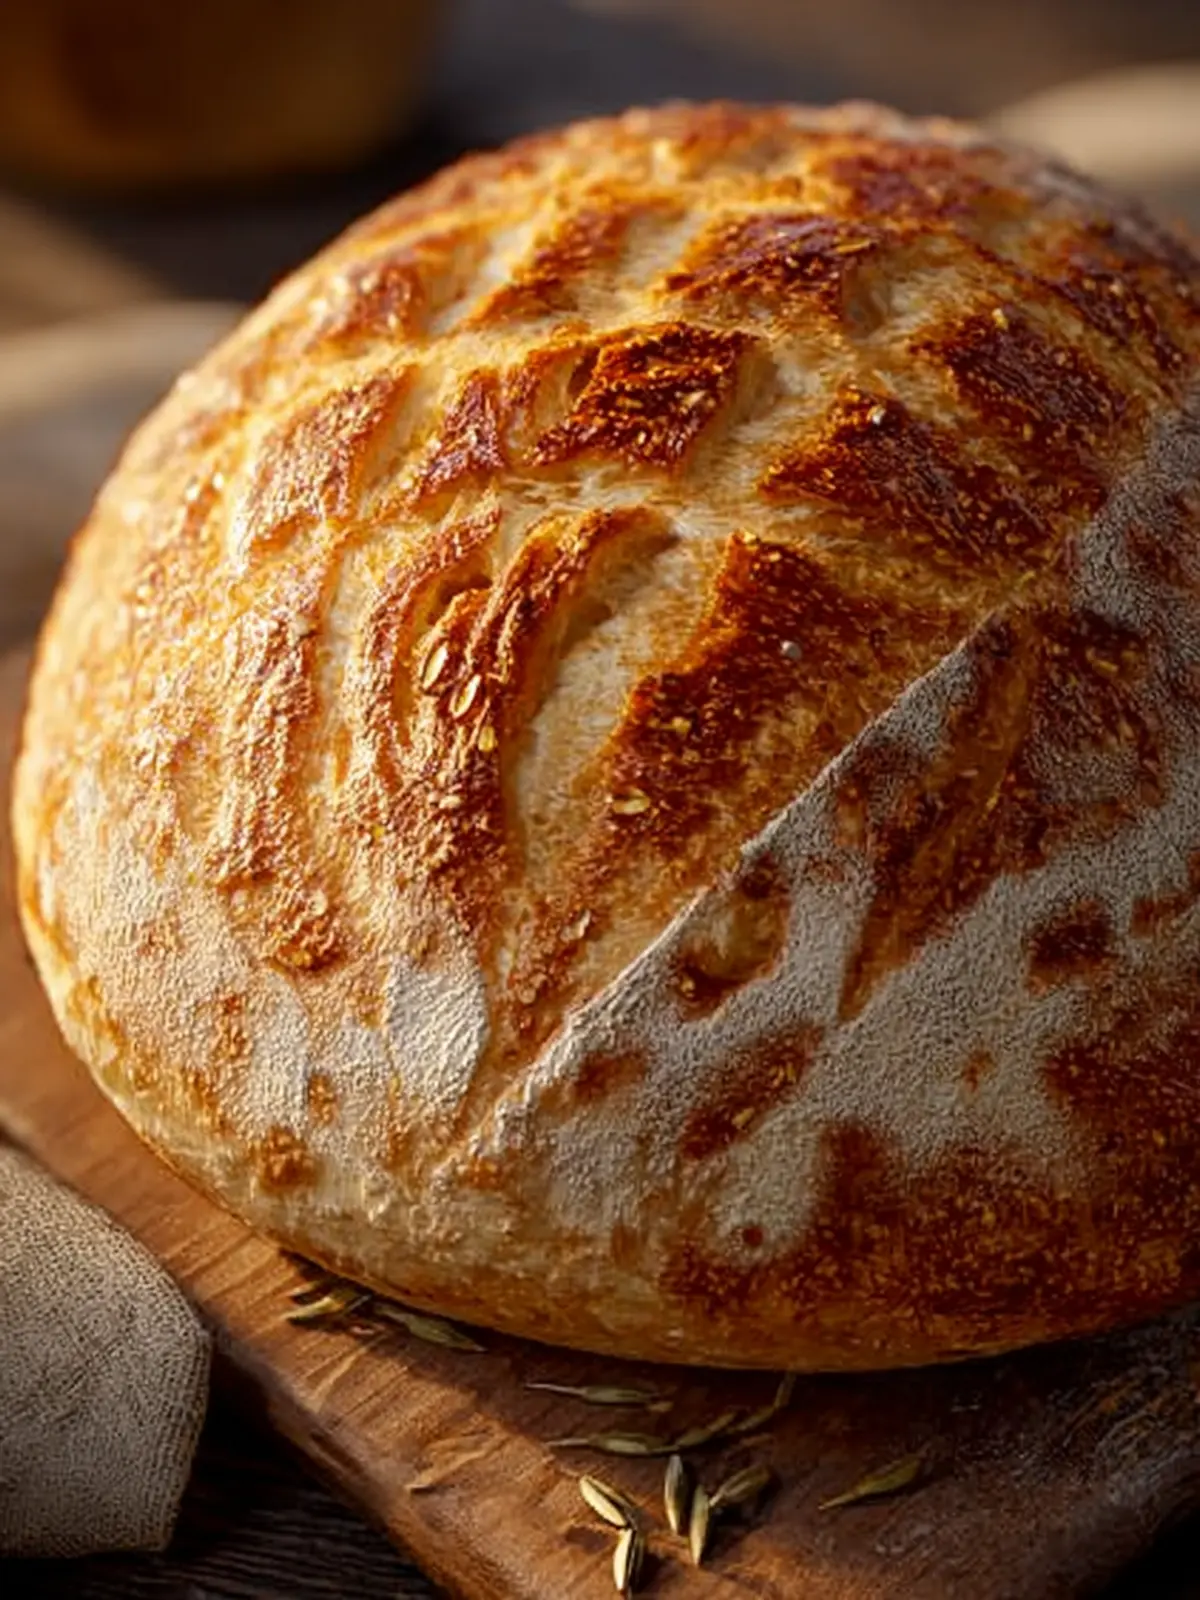
Scoring Like a Pro
Before baking, you’ll want to score your sourdough boule. This is not just for aesthetics—scoring helps direct the steam as it bakes, creating that lovely open crumb structure. Use a sharp blade for clean cuts!
Storing Your Boule
To keep your sourdough boule fresh, store it in a paper bag at room temperature. Avoid plastic, as it can make the crust soggy. If you have leftovers, consider slicing and freezing them for future enjoyment.

Serving Suggestions for Sourdough Boule
Imagine pulling a fresh and warm sourdough boule from your oven, its crust crackling softly as you slice into it. The deep, tangy flavor makes it incredibly versatile, perfect for any gathering or simple meal at home.
With Spreads and Toppings
- Buttery Goodness: Slather on some high-quality butter and sprinkle a hint of sea salt for a simple yet indulgent treat.
- Avocado Toast: Thin slices of sourdough boule paired with avocado, a squeeze of lemon, and a dash of chili flakes create a trendy breakfast or lunch option.
Perfectly Paired with Soups
- Sourdough and Soup: Serve your sourdough boule alongside a warm bowl of tomato bisque or creamy pumpkin soup. The bread is perfect for dipping and adds a rustic touch to the meal.
Sandwich Base
- Creative Sandwiches: Layer slices of your favorite deli meats, cheeses, and fresh veggies on sourdough boule for a deliciously crunchy and flavorful sandwich experience that will elevate any lunch.
By incorporating these serving suggestions, you’ll make your sourdough boule the star of any meal!
Time Breakdown for Sourdough Boule
Understanding the time involved in creating a sourdough boule helps set realistic expectations for your baking adventure. Let’s break it down:
Preparation Time
The journey begins with approximately 30 minutes of preparation. This includes mixing your ingredients — flour, water, salt, and your lively sourdough starter. It’s the moment you engage with your dough, and trust me, every second feels worth it.
Proofing Time
After preparing your dough, it’ll need some love during the proofing stage. Expect around 4 to 6 hours for the bulk fermentation. During this time, the dough will rise, develop flavor, and become airy and light, resulting in that delightful crumb we all crave.
Baking Time
Once proofed, baking the sourdough boule usually takes about 30 to 40 minutes in a preheated oven. Keep an eye on that crust; the rich golden-brown color signals it’s time to enjoy the fruits of your labor.
Total Time
Compiling all of these steps, the total time for making a sourdough boule comes to around 5 to 7 hours. While this may seem extensive, remember that a significant portion of it involves waiting while that beautiful fermentation happens.
Nutritional Facts for Sourdough Boule
Understanding the nutritional profile of your homemade sourdough boule can help make mindful eating choices while indulging in its delightful crust and chewy interior.
Calories
A typical serving of homemade sourdough boule contains approximately 200 calories. This makes it a satisfying yet light addition to any meal, whether it’s breakfast, lunch, or dinner.
Carbohydrates
With about 40 grams of carbohydrates per serving, this bread provides a good source of energy. Those carbs come from wholesome ingredients, making each slice a substantial component of your diet.
Protein
This beloved sourdough boule offers around 7 grams of protein per serving. While it’s not a protein powerhouse, it does contribute to your daily intake, especially when paired with toppings like nut butter or cheese.
Incorporating this sourdough boule into your meals not only satisfies your taste buds but also aligns with your nutritional goals!
FAQs about Sourdough Boule
Creating a delicious sourdough boule can sometimes lead to questions, especially when you’re looking for that perfect loaf. Let’s tackle some of the most common queries to help you enhance your baking experience.
How can I create the perfect crust?
Achieving that coveted crunchy crust on your sourdough boule is all about moisture and heat. Here are several tips:
- Steam in the Oven: Introducing steam in the first stages of baking can significantly improve the crust. Place a pan of hot water at the bottom of the oven or spray the loaf with water just after you place it in.
- Use a Dutch Oven: Baking your bread in a preheated Dutch oven retains moisture, resulting in a beautifully crispy exterior while allowing the interior to rise properly.
- Proper Scoring: Make sure to score your loaf before baking. This helps control the bread’s expansion and leads to an attractive crust formation.
Why is my sourdough boule dense?
A dense sourdough boule can be frustrating, but it’s often due to a few common issues:
- Insufficient fermentation: If your dough hasn’t risen enough during the bulk fermentation stage, it may end up too dense. Always ensure your starter is bubbly and active before use.
- Kneading Technique: Under-kneading can lead to a tight crumb. Be sure to develop the gluten properly during the kneading phase.
- Flour Types: The type of flour used can also impact texture. Consider adding a bit of high-protein bread flour for a lighter texture.
Can I use whole wheat flour instead of bread flour?
You can absolutely incorporate whole wheat flour into your sourdough boule, but keep in mind:
- Flavor and Nutrition: Whole wheat flour adds a nutty flavor and increases the nutritional profile. However, it can absorb more water, which may require adjustments in hydration levels.
- Mixing Flours: If you’re new to sourdough, try starting with a mix of bread flour and whole wheat before switching entirely to whole wheat for the best results in texture and flavor.
With these answers in hand, you’re now better equipped to create a scrumptious sourdough boule. Happy baking!
Conclusion on Sourdough Boule
The journey of baking a sourdough boule is truly rewarding, transforming humble ingredients into a crusty loaf that’s bursting with flavor. Each step, from nurturing your starter to the final bake, allows you to connect with the art of bread-making. Enjoying a freshly baked boule, with its airy interior and crispy crust, is an experience worth savoring.
Whether you share it with friends or relish it during a quiet moment alone, a loaf of sourdough boule enhances any meal. As you master this timeless technique, remember that every bake brings its own unique story. Happy baking!
Print
Sourdough Bread
- Total Time: 9 hours
- Yield: 1 loaf 1x
- Diet: Vegetarian
Description
A step-by-step guide to making sourdough bread from scratch.
Ingredients
Scale
- 125 g active sourdough starter (fed and bubbly)
- 325 g warm filtered water (around 90°F)
- 500 g bread flour
- 12 g sea salt
- Rice flour, for dusting the banneton or tea towel (optional)
Instructions
- In a large mixing bowl, stir together the warm water and sourdough starter until mostly dissolved. Add the bread flour and salt. Mix with a dough whisk, fork, or your hand until fully combined and no dry patches remain. The dough will look shaggy and feel sticky.
- Cover the bowl and let the dough rest at room temperature for 45 minutes.
- After resting, knead the dough in the bowl for about 5 minutes. Use your hand and a flexible dough scraper to fold the dough over itself. The scraper is helpful for lifting the dough and cleaning your hands. This short kneading session helps kickstart gluten development.
- Cover again and let the dough rest. Complete 3 sets of stretch and folds, spaced 30–45 minutes apart. For each session, perform 4 to 6 folds: wet your hand, lift and stretch the dough from one side, and fold it over to the other side. Rotate the bowl and repeat on all sides. This strengthens the dough and improves structure.
- After the final fold, cover and allow the dough to bulk ferment at room temperature. This step typically takes 4 to 8 hours, depending on your kitchen temperature. Look for the dough to rise noticeably, become domed and jiggly, and form visible bubbles along the sides and bottom of the bowl (a clear bowl is helpful here).
- Once bulk fermentation is complete, dust a clean work surface lightly with flour. Gently turn out the dough. Stretch it into a loose rectangle (it doesn’t need to be large), then fold each side inward toward the center like folding a letter. Starting from one short end, roll the dough up into a log.
- To shape the dough into a boule, use the push-and-pull method: gently cup your hands around the dough and pull it toward you along the counter to create tension across the surface. Then rotate it slightly and repeat, pushing it away, then pulling it back toward you again. Continue turning and repeating this motion until the dough forms a tight, round ball with a smooth surface.
- Place the dough into a banneton dusted with rice flour or lightly floured bread flour. If you don’t have a banneton, use a medium bowl lined with a thin, floured tea towel. Cover and transfer to the refrigerator to cold proof for 8 to 12 hours. (Note you can cold proof up to 48 hours. If cold proofing more than 48 hours, this can cause your loaf to be flat when baked.)
- When ready to bake, preheat your oven to 475°F with a Dutch oven inside for at least 30 minutes.
- Remove the dough from the fridge, turn it out onto parchment paper, and score the top with a sharp razor or bread lame.
- Carefully transfer the dough (on parchment) into the hot Dutch oven. For extra steam, you can drop 2 to 3 ice cubes between the parchment and the wall of the Dutch oven just before closing the lid. The added steam can help promote better oven spring and a shinier, crisper crust.
- To ensure the bread is fully baked, use an instant-read thermometer inserted into the center of the loaf. It should register between 205–210°F when done.
- Let the bread cool on a wire rack for at least an hour before slicing.
Notes
- You can adjust the cold proofing time based on your schedule.
- A clear bowl is helpful for monitoring fermentation progress.
- Prep Time: 8 hours
- Cook Time: 1 hour
- Category: Bread
- Method: Baking
- Cuisine: American
Nutrition
- Serving Size: 1 slice
- Calories: 100
- Sugar: 0.1 g
- Sodium: 200 mg
- Fat: 0.5 g
- Saturated Fat: 0.1 g
- Unsaturated Fat: 0.2 g
- Trans Fat: 0 g
- Carbohydrates: 20 g
- Fiber: 1 g
- Protein: 3 g
- Cholesterol: 0 mg